Quick & Easy: VPN through SSH Tunnel
In untrusted environments like open WiFi Hotspots, you want to tunnel your traffic through an encrypted channel to the internet. Last year Firesheep has proven successfully how dangerous surfing in a public, non-encrypted hotspot can be. A Virtual Private Network (VPN) can also be used to access internet services with IP Address restrictions (e.g. Video or Music streaming services like Netflix, Hulu, or Spotify). In this post, I’ll show you a VPN solution that can be easily set up and used. The tutorial will work with Windows and Mac OSX.
What’s the best VPN solution?
Many roads lead to Rom. Probably, the most common VPN solutions are, SSH-Tunnel, PPTP, and OpenVPN. I think that OpenVPN is the best option, it’s robust and secure. However, it’s a bit more difficult to set up. On the other hand, PPTP is easy to set up and if encryption is enabled, it should do the job just as well, at least in non-critical infrastructures. Finally, the Secure Shell (SSH) can also be used to create an encrypted tunnel between two computers. It uses onboard means, is properly integrated into the Operating System, and provides state-of-the-art security.
What’s needed?
To establish a VPN connection you need to connect from your local computer to another endpoint, which usually is a server. in another post, I’ve described how easy it is today to set up a server in the Amazon EC2 cloud. Another solution could be your home router, in case it’s using a Mini Linux Kernel (like DD-WRT or Tomato).
SSH tunnel on Mac OSX
With the help of SSH, a SOCKS proxy can be created with just one command.
ssh -i "your private SSH key file" -D "port" "username"@"server"example:
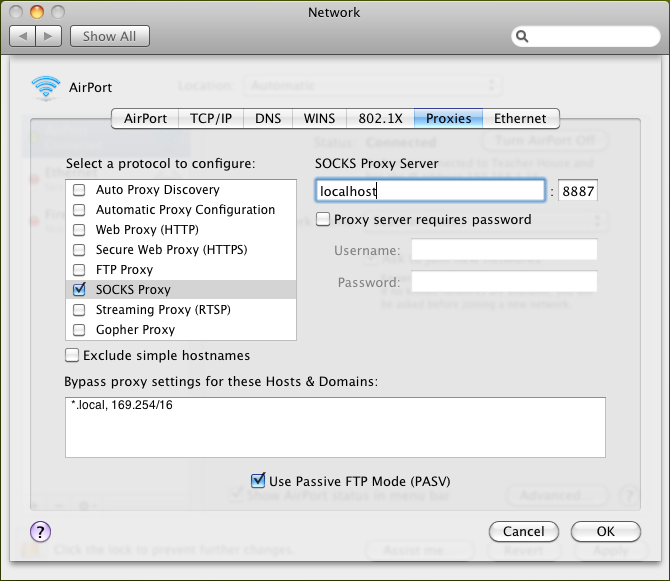
ssh -i mykey.pem -D 8887 tobias@myserver.comThat’s it. Now you just need to route your traffic through the local SOCKS proxy you’ve just created. Therefore open in Mac OSX:
System Preferences > Network > Advanced > Proxies
and enter the data as shown in the picture below (localhost & port).

SSH tunnel on Windows
On Windows, I suggest using an SSH client called Putty. Putty comes with a nice Graphical User Interface so you don’t have to use the command line at all. I found a nice tutorial. Instead of copying it, I rather link it. It explains how to use putty to create an SSH tunnel.
Don’t forget to register your SSH key within Putty. Otherwise, the server might not accept your connection!
Advanced: DNS through SSH
In case you are worried about sending your DNS lookups over the local WiFi, you might want to tunnel them as well through the SSH tunnel. It’s not that easy, because SSH is based on TCP and DNS lookups are UDP. Since this is an advanced topic, I would like to refer to another website that explains in detail how to tunnel UDP packets through a TCP connection. If you are concerned about the DNS lookups, I think it might be the right time to think about a true VPN tunnel with PPTP or OpenVPN, both solve this problem.
Troubleshooting
- In case the tunnel doesn’t work, try to establish a normal SSH connection
- The standard port for SSH is 22
- Make sure you have the private key on your client
- Check the firewall on the server (Port 22 TCP needs to be open)
- Check the Security rules on Amazon EC2 (Port 22 TCP needs to be open)